The Red portion of the ray is a Ray Trace ray, the White portion is the Ray Marched portion of the ray.
The lens is parented to the CameraHandle Null Object and so is the Lens object. If you want to move the camera in your scene, use the CameraHandle to move it. That way the lens stays with the camera.
There are 2 answers to this one and it depends on what mode you are using WaveFilter Volume in. If you are using the Hypertexture Cloud Ball mode, then the answer is simple. You can't fly through or into it or the effect fails. But if you are using any other mode, then the challenge is related to the fact that Volume needs both a back and a front to work. It collects data as LightWave renders the back of the Volume object and then creates the Volume as it renders the front of the object. When you fly inside, the front of the object never renders and that means you collected the data needed to render but never told Volume to actually generate the volume.
To render volume with the camera inside a Volume object, you need a lens on the camera. the lens works as the front. Now if you put a lens on your camera and are outside your Volume object, you will notice that the volume is generated between the object front and the lens as well as inside the object itself. To avoid this, dissolve the lens object until the frame where the camera enters the Volume object. That way until the camera enters, the front of the object works as the front and once inside, the lens works as the front.
Several people have noticed that WaveFilter Volume can give strange results when no AA
is used, you see polygon edges. There is a peculiarity in LW that causes a shader to not
be called at every pixel along polygon edges when no AA is used and Adaptive Sampling is
turned on.
The solution, when doing test renders with no AA is to turn off adaptive sampling.
This peculiarity seems to also exist in all of the Enhanced AA modes. So if your using
WaveFilter Volume or any shader for that matter, do not use the Enhanced AA modes.
Besides, using WaveFilter Image Edge Blend Filter is better then using Enhanced AA anyway.
In demo mode WaveFilter Volume is limited to only effecting resolutions up to 752x480 on frames 0 to 29 only. So on frames past 29 you get no effect at all. You get the objects just as you would without adding WaveFilter Volume.
A surface is solid and renders by painting the solid surface with a texture, the object's surface is represented by an infinitely thin layer defined by a polygon. A Hypertexture is a surface with depth to it. A Hypertexture not only renders the texture at the surface, but between surfaces. A Ray Tracer casts a ray from the camera until it intersects a surface, at that point the intersected surface is sampled and that information is used to render a pixel of the image. A Ray Marcher also casts a ray from the camera, but it takes samples as it marches its way down the ray. That lets it sample the air, and thus it can create volumetric effects.
WaveFilter Volume is a form of Ray Marcher but with a twist. A ray is cast from the camera until it intersects with a front surface, like a Ray Tracer, but then it switches to Ray March mode and marches until it hits a back surface. This allows WaveFilter Volume to create volume objects.
The Red portion of the ray is a Ray Trace ray, the White portion is the Ray Marched
portion of the ray.
WaveFilter Volume requires a front and back surface to render a volume object. By making you volume object double sided, one object works as both the back and front surfaces.
WaveFilter Volume requires a front and back surface to render a volume object. By making you volume object double sided, one object works as both the back and front surfaces.
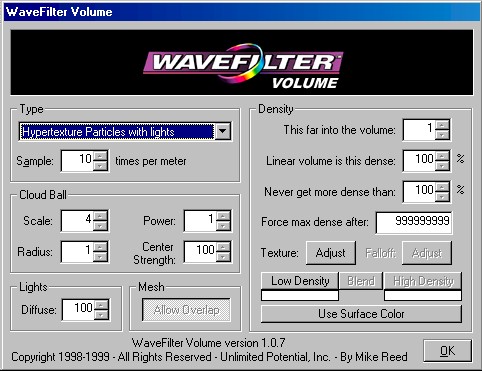
Type Section
This section includes the drop down that lets you select the mode used and the
number of samples taken per meter. The Ray Marcher takes steps sampling the volume at the
rate given in the Samples X times per meter text box. This has a huge effect on render
times and quality. You want the lowest setting that gives you the results you want. Too
low a setting will result in banding and not defining fine details. Too high a number
simply extends render times with no added advantage. This value is worth tweaking to get
perfect. Start low, then raise just to the point where banding vanishes. AA also helps
limit banding so use the final AA settings and WaveFilter Image's Edge Blend filter as you
search for the optimum setting for this value.
Cloud Ball Section
This section is only used in the Hypertexture Cloud Ball mode. The texture set in
the Density section is used to perturb the outer edge of a cloud ball. The Scale variable
controls the scale of the inner noise pattern in relation to the texture used to perturb
the outer edge of the cloud ball. The larger the scale, the tighter the inner noise
pattern gets. A setting of 1 matches the outer pattern and a setting of 0 cause there to
be no inner noise at all. Radius controls the size of the cloud ball. If your bounding
object is larger then the specified size then the cloud ball will flow centered in the
bounding object. If the bounding object is smaller then the radius then the effect will
still be the size specified, but only the portion inside the bounding object will render.
The Power variable is a multiplier for the density of the inner noise. The Center Strength
variable determines how strong the center pulls on the outer edge of the cloud ball. A
setting of 0 makes a perfect sphere. A setting of 100 pulls the outer edge all the way to
the center where the texture value is black (0%). White (100%) sections of the texture
will be unaffected by the Center's strength.
Lights Section
Diffuse is active only in modes that support light sensitivity. Other modes use
the shading of the bounding object to shade the volume and have no reaction to lights
beyond the reactions of the bounding object. In the Hypertexture with Lights and
Hypertexture Particles with Lights modes the diffuse value determines how sensitive to
light the volume is. A value of 0 creates a volume that is not light sensitive. A settings
between 1 and 100 create a volume that is dark unless lit by a light. The color of the
light is used to color the volume. The Low Density color from the Density section is used
as an ambient color.
Mesh Section
The Allow Overlap option allows complex objects to be used as bounding objects.
Density Section
This far into the volume X Linear volume is this dense D %. The relationship of X and D is
very important to define how dense the Hypertexture will be. The X value allows you to
select a distance that is relative to your bounding object. If you set X to a value
similar to the total depth of your bounding object, it makes the D value much easier to
set. The D variable simply sets the density that will occur at the distance inside the
volume set by the X variable. Something to keep in mind is that if you use a texture for
the volume that it may take quite a bit further to reach 100% density then if no texture
is used. When no texture is used, the density at each step in the Ray March is constant.
But if you use a texture, only the steps that hit on White (100%) areas of the texture are
equal to the linear value, all shades of gray in the texture cause the density to build
more slowly and thus it takes longer to build up a solid volume.
Never get more dense then N % lets you limit the maximum density that the volume will reach. The Force Max Dense after M variable lets you cut rendering times when a texture is used that may have very thin parts in it. The distance set here is the max distance a ray will march. If the distance to march is greater then M then the ray is not marched and a density of 100% is used. This is very fast as it avoids the entire Ray March effort.
Low Density sets the color used as the ambient light level in light sensitive modes as well as the low density color in the falloff volume modes. The High Density color is used as the color for high density areas in a falloff sensitive modes. The Blend button opens the panel that lets you control how the two colors are blended as the density shifts from low to high. The Use Surface Color button overrides the Low/High density colors and uses the surface applied to the bounding object to define the surfacing of the volume.
The shadows are generated using the bounding objects shadow data. So if you have a sphere lit from the top left with 100% Diffuse and 0% Luminosity, you get normal shadows in the volume. If you change the surface to 0% Diffuse and 100% Luminosity, the same way the ball would not have shadows without WaveFilter Volume, the volume will not have shadows either.
There are several ways to color the volume. You can specify the color directly with the Density color selectors, you can use colored lights in the volume or you can select the Use Surface Color option and the original surface color will be used to color the volume. Each mode supports one or more of these methods. The available methods will be enabled on the interface.
To keyframe any variable in any WaveFilter plug-in, perform the following steps:
The interface will show the setting at frame zero but the Graph Editor will show all keyframes. A null created for one instance of Volume will effect every instance of Volume.
Surface with volume in front of it
This is the default setting for the plug-in. It is applied to all surfaces that
reside inside the volume. WaveFilter Volume requires a back and a front to define the
volume area. Any surface can define the back by using this setting. If a front is found
volume will be rendered between the front and any surface with this setting. The
WaveFilter Evolver utility that is part of the WaveFilter Tools package can make adding
WaveFilter Volume, or any plug-in, fast and easy even with many surfaces.
Surface passing behind and into the volume
This is the same as "Surface with volume in front of it" with one
exception, unless some other surface has been rendered as a back, this mode will not act
as a back. This allows a surface to start behind the volume and then enter the volume from
behind. Once inside the volume it will act just as it would if you used the
"Surface with volume in front of it" mode. An example might be if you
wanted a hand to reach into the top of a fish tank, you would use this mode on the hand
and no volume would render in front of the hand until it was inside the tank.
Linear volume
This is the simplest and fastest mode of volume you can create. It is basically
the same as LightWave's built in fog, with the exception that it can be contained within a
volume object. You set the color of the fog with the High Density color. This is not a Ray
Marched mode. It simply measures the distance from the back to the front and uses that to
create the fog. Any shadows used on the fog are gathered from the bounding object. So if
you fill a ball with Linear volume, you will see it shaded just like the solid version of
the ball, but it will be filled with fog. All non-light sensitive modes work this way.
Falloff volume
This mode expands on the Linear volume mode and is nearly as fast. It gives you
the ability do control the falloff of the fog and to control the color as the fog falls
off. Like linear volume, this is not a Ray Marched effect.
Use the Falloff Adjust to change how the fog density increases. When the Linear Density button is pushed in on the Density Adjust panel, the fog will falloff exactly like it does in Linear volume mode. But if the Linear Density button is raised, the Bezier control will activate. You may then adjust the way the fog gains in density over distance by moving the handles of the Bezier curve.
Use the Low Density and High Density colors to control the color of the fog at the different densities. Use the Blend button to open the Density Color Blend dialog. When the Linear Blend button is pushed in, the color will change from the Low Density color to the High Density color as the density of the fog increases. Raise the Linear Blend button to activate the Bezier curve. Use the Bezier to control the way the colors blend between 0 density and 100% density. It should be noted, at zero density, there is no fog, and thus you will never see the Low Density color in the fog, only where the fog is present at densities above 0% can you see any coloring effect.
Hypertexture
This is the simplest mode that uses the Ray Marcher. Because it actually marches
the volume between the back and front of the area to be filled with volume, it is a much
slower mode. but it has the added benefit that you can include 3D textures within the
volume. If you click the texture Adjust button in the Density section, you will notice the
same texture Adjust panel used in WaveFilter Shader. If you have questions about this
dialog, you should check the WaveFilter Shader manual.
Hypertexture with lights
This is the same as the Hypertexture mode with the added benefit, and render hit,
that it uses the lights in the scene to light the Hypertexture. Keep in mind, when in this
mode, any Hypertexture that is not lit by at least one light will be dark. Use the Low
Density color to set the Ambient color of the Hypertexture.
Hypertexture Cloud Ball
This mode is very unique and has limited uses. It was designed to do explosions,
fireballs and perfect planets with no polygon edges. It makes a perfect sphere
with a definable radius. It takes it's surfaces properties from the bounding object, which
is usually a sphere that is slightly larger then the radius of the Hypertexture Cloud
Ball.
Hypertexture Particles
This mode is identical to the Hypertexture mode with one exception. In this mode
the volume will only show up if it is within the radius specified from a Particle object.
Any object named "Particle" or "WF_VolumeParticle" may be used. The
center of the object will be used as the center of the particle. Normally Null Objects are
used. The WaveFilter SPIT utility that is Part of WaveFilter Tools can be used to convert
the points in any object to properly named null objects for use with WaveFilter Volume.
The density of the volume is directly related to the density of the particles. The more particles in an area the greater the density. Each particle is basically a Hypertexture Cloud Ball centered on each particle. The entire volume gets it's shadows from the container object. Set different colors for the Low Density and High Density colors to reveal the details.
Hypertexture Particles with lights
This mode is basically a combination of the Hypertexture Particles and
Hypertexture with lights.
A Lens object is needed any time the camera is inside the volume. Objects in the scene and the main bounding object act as the back for the volume and the Lens object works as the front for the volume. This fills the scene with volume right up to just in front of the camera. A Lens object can be a simple polygon, but it is best to use a small sphere. The volume texture is set on the Lens object. This lets you build a collection of Lens objects for effects that can be reused. A number of Lens objects are included with WaveFilter Volume.
To keep the Lens object on the camera, create a CameraHandle null object and parent the camera to the null. Also parent the Lens object to the null. Then use the handle to move or rotate the camera. if you move the camera, it will leave the Lens object behind.
The bands in a Hypertexture represent the samples taken inside the Hypertexture. By increasing the number of samples per meter just until the bands all blend together will result in the fastest possible render times. Allowing banding during test renders can greatly decrease set up time by making test renders much faster. Note that more samples are needed at higher resolutions.
WaveFilter Volume uses the LightWave lighting model to create shadows and lights in the light sensitive Hypertexture modes. Shadow maps in LightWave only contact the surfaces that cast them when the Shadow Fuzziness value is 0.0.
WaveFilter Volume supports all LightWave light types. To exclude a light sensitive Hypertexture from being sensitive to a light, simply put a minus sign in as the first character of the lights name. Example: "Main Light" and "Fill Light" will be seen by the volume, but "-Gaffer Light" and "-Detail Light" will not.